はじめに
前回は、JSF入門初回ということで、環境構築とバッキングビーンの値をビューに表示しただけでした。
これではあまりに動きが無さ過ぎるので、今回はボタン押下時のイベントを付与していきます。
h:commandタグ
JSFでは、ボタンを画面上に表示するためにh:commandタグを使用します。
[html] <h:commandButton value="ボタン" action="#{bean.mymethod}" />[/html]
画面描画時は、htmlタグのinputタグ(type=”submit”)に変換されて出力されます。
h:commandタグに、action、又はactionListener属性を付与し、そこにEL式でバッキングビーンのメソッドを紐付けることでイベントをハンドルします。
actionとactionListenerの違い
前述の通り、h:commandButtonタグは、actionとactionListenerの2種類の属性を与えることが出来ます。
使い分けとしては、actionはページ遷移を伴う場合に使用し、actionListenerは画面遷移を伴わない場合に使用します。
actionで与えるメソッドの戻り値が、ページ遷移先のURLとなります。
また、バッキングビーン側のメソッド定義も異なり、
actionではString型の戻り値を返し、引数は無しのメソッドを、
actionListenerではvoid型、引数にActionEventを受け付けるメソッドを、定義します。
actionListenerにActionEventを受け付けないメソッドを与えると、ページ表示時にJavaのExceptionが発生しますのでご注意を。
実際にコーディングして確認する
それでは、実際にボタンイベントをハンドルするページを作ってみましょう。ベースは前回のソースです。
/WebContent/index.xhtml
[html] <?xml version="1.0" encoding="UTF-8"?><!DOCTYPE html>
<html xmlns="http://www.w3.org/1999/xhtml" xmlns:h="http://java.sun.com/jsf/html" >
<h:head>
<meta charset="utf-8"/>
<title>Index Page</title>
</h:head>
<h:body>
<h2>Login Page!!</h2>
<h:form>
<div>
<h:inputText value="#{indexBean.id}" />
</div>
<div>
<h:inputText value="#{indexBean.password}" />
</div>
<h:commandButton value="ページ遷移を伴うボタンイベント" action="#{indexBean.actionMethod}" />
<h:commandButton value="画面内ボタンイベント" actionListener="#{indexBean.actionListener}" />
</h:form>
#{indexBean.message}
</h:body>
</html>
[/html]
ログイン画面風に2つの入力項目を持つ画面にしてみました。
JSFにおける入力項目の配置は、h:inputTextタグを使用します。value属性にEL式でバッキングビーンのプロパティを与えることでデータバインドが行われます。
ちなみに、お察しの通り、画面に描画される際にはh:inputTextタグはinputタグ(type=”text”)に変換されます。
次に、今回記事のメインであるh:commandButtonを2つ配置しています。
1つ目のボタンはaction属性を、2つ目のボタンはactionListener属性を与えて、それぞれEL式でバッキングビーンのメソッドを与えます。
/src/view/IndexBean.java
[java] package view;
import javax.faces.bean.ManagedBean;
import javax.faces.bean.SessionScoped;
import javax.faces.event.ActionEvent;
@ManagedBean
@SessionScoped
public class IndexBean{
private String id;
private String password;
private String message;
public String actionMethod(){
return "/resources/page/mainpage.xhtml";
}
public void actionListener(ActionEvent actionEvent){
this.message = "login button pressed!! id=" + this.id + ", " + "password=" + this.password;
}
public String getId() {
return id;
}
public void setId(String id) {
this.id = id;
}
public String getPassword() {
return password;
}
public void setPassword(String password) {
this.password = password;
}
public String getMessage() {
return message;
}
public void setMessage(String message) {
this.message = message;
}
}
[/java]
ビューでid, password, messageプロパティを表示しているので、バッキングビーン側でもそれに対応するように定義しています。
また、h:commandButtonのaction属性とactionListener属性で、actionMethod, actionListenerをそれぞれバインドしているので、actionMethod側はString値を返却するメソッドを、actionListener側はvoidでActionEvent型の引数を受け取るメソッドを定義します。
actionMethod側は、返却する値が遷移先のページとなるため、飛びたいURLを返却します。
今回は、/resources/page/mainpage.xhtml を遷移先として与えています。
/WebContent/resources/page/mainpage.xhtml
[html] <?xml version="1.0" encoding="UTF-8"?><!DOCTYPE html>
<html xmlns="http://www.w3.org/1999/xhtml" xmlns:h="http://java.sun.com/jsf/html" >
<h:head>
<meta charset="utf-8"/>
<title>MainPage</title>
</h:head>
<h:body>
<h2>Main Page!!</h2>
<div>
Your ID = #{indexBean.id}, Your Password=#{indexBean.password}
</div>
</h:body>
</html>
[/html]
遷移先ではid, passwordを画面に表示しています。それだけです。
実行結果
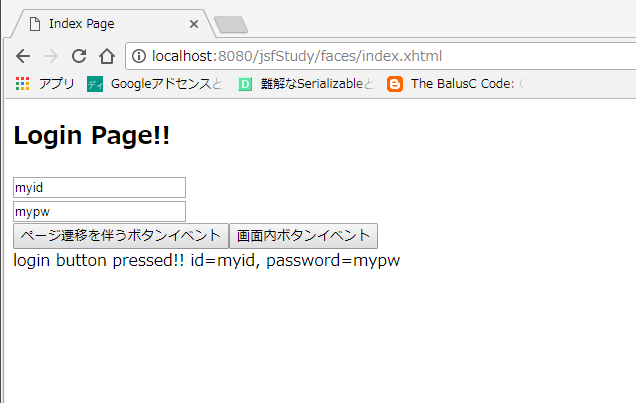
2つの入力項目と2つのボタンが表示されて、2つ目のボタンを押下するとページ遷移無しで画面下部にメッセージが描画されます。
1つ目のボタンを押下すると、ページ遷移します。
今回は以上です。


